Photographing a Lunar Eclipse
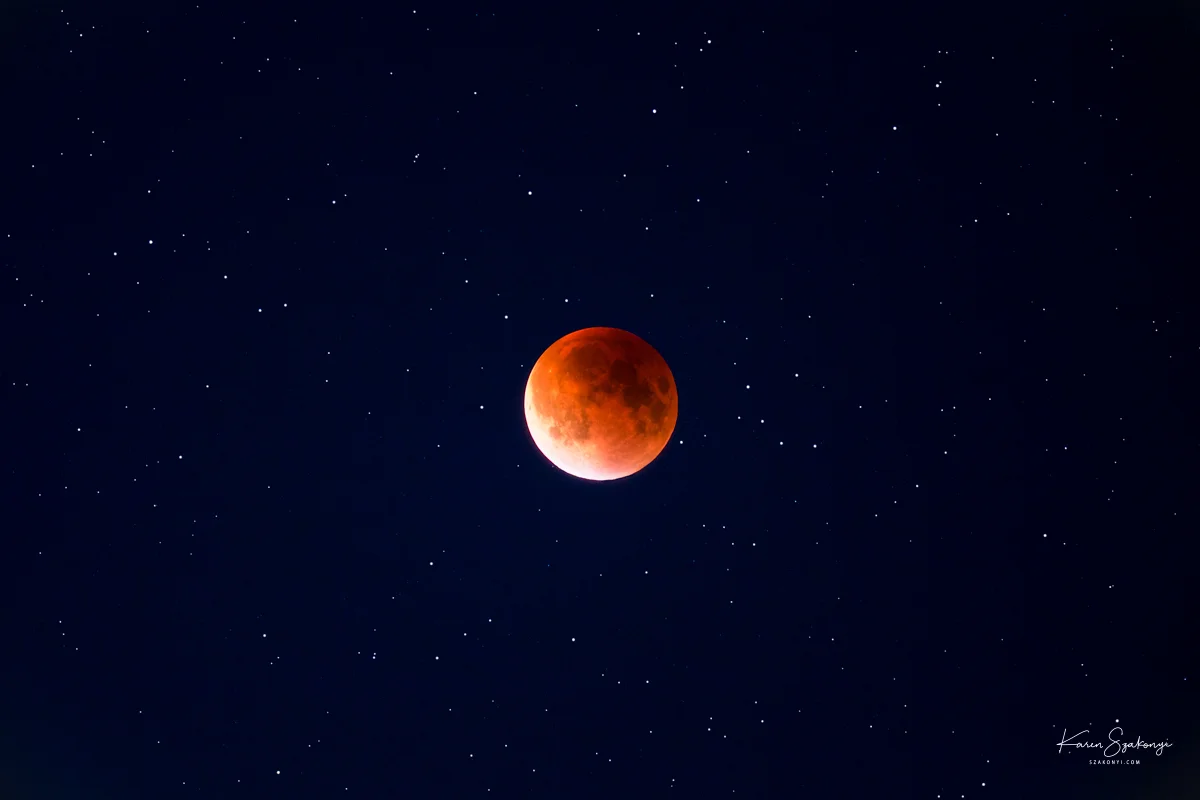
Lunar Eclipse 2015, Photographed through 80 mm Explore Scientific APO telescope using Canon 5dmiii on a tracking mount.
LUNAR ECLIPSE PHOTOGRAPHY
Photographing a lunar eclipse, is not as difficult as it seems, although taking the photo at the top of this page was difficult, but that photo isn’t the goal of these instructions. For eclipse photography, you cannot use auto-focus and you cannot use any of the automated modes on your camera. You will have to use manual mode and turn off auto-focus. If your camera doesn’t have a manual mode, or you can’t turn off auto-focus then these instructions won’t help. These instructions really are for people that have a DSLR, but have pretty much always used the program modes, so it’s not going to explain the technical aspects of aperture, because a) you don’t care and b) for most people it takes a while to understand it, and c) you just don’t care.
For the purposes of these instructions, the goal is to tell you what to do if the picture you just took is too bright or too dark. If you want to understand what the camera does when you change the aperture there are a million or so YouTube videos that will explain it.
What you Need
For taking a successful Lunar Eclipse photo, you will need a few basic items.
A camera which has a “manual” mode
A lens that can zoom 200 mm or longer (i.e. 200, 300, 400) and has the ability to focus manually. There is usually a switch on the lens that turns off the auto-focus mode. If you don’t have a “close-up” lens, you can still take photos at 100mm or so, the moon is just going to be pretty small.
A tripod.
It’s helpful to have a remote shutter trigger, but if not, a timer mode will work. If you don’t have a remote shutter and your camera doesn’t have the ability to delay a second or two after you press the shutter, then you can very carefully trigger the shutter, but it likely will affect your photos.
A flashlight to see your camera controls in the dark.
Don’t forget a memory card and maybe a spare battery
Manual Mode
There are a few things you will need to know how to do in manual mode, other than getting the camera in Manual mode, which on a DSLR usually means finding and twisting the dial to “M” for manual. Now that wasn’t so scary, was it?
Once in Manual mode, you need to know how to adjust your aperture and adjust your shutter speed. This is something that is going to be different on every camera, so if you don’t know how to change the aperture and/or shutter speed, refer to your manual or search online to figure these two things out. It’s not rocket science and there are probably fifty thousand videos on YouTube showing you how to do it; unfortunately most of them will also go into great detail on what is happening when you change the Aperture. Just concentrate on figuring out how to change the numbers for the Aperture and the numbers for the shutter for your camera. You will also want to know how to adjust the ISO settings on your camera.
For the purposes of taking a photo of the moon, you don’t have to understand aperture and/or shutter speed, you just have to be able to change those two settings while in manual mode on your camera. It might also be helpful if you can do this in the dark, but if not, they make these little lights called flashlights. Get one and bring it along on the night of the eclipse.

The photo on the left was taken during with an iPhone. Hard to say what it did to get that masterpiece, but all things considered, it’s not too horrible, although it isn’t something I’d normally let anywhere near my web-site.
The next photo was the exposure before the eclipse started. This is the photo you want to get before the eclipse starts, so that you know your lens is focused and the exposure is where it should be at this point. This was taken at ISO 400, F13 for 1/125th of a second. The lens was at 400mm.
The third photo is what you are aiming for during the total eclipse. This was taken at ISO 800 for about 3 seconds at F8 on a tracking mount through a telescope, but you might be able to get a very similar photo, at ISO 1600 for 1/2 to 1 second at F5.6. It might be a bit darker, but if you shoot in RAW you will have a bit more leeway to adjust the exposure after the fact.
Setting Exposure and Focusing
If you use an auto mode on your camera, your eclipse photos might look like the photo above on the left, but more than likely it will just be a white blob. The photo will never come out properly on an auto mode. Maybe one day technology will give you an “eclipse mode”, but right now the DSLR isn’t going to do it. Some of the point and shoots might not do too bad, but you won’t get a shot that you can blow up and see some good detail, or at least I can’t do it with a point and shoot.
You will want to set your initial exposure and get the focusing done before the moon is getting too far into the eclipse phase. It’s very difficult to focus when the eclipse is in totality. When you are done with these steps, hopefully your picture will look similar to the second picture from the left above. You want to be able to see the patterns on the moon and if you zoom in on your LCD see some sharp edges on the crater.
If at all possible start this phase about an hour or so before the eclipse so that you have plenty of time to get prepared.
Set your ISO to 400, but be forewarned that you will probably be setting this to ISO 800 or ISO 1600 during totality.
Manually focus the moon while looking through the viewfinder. You have to turn the auto-focus off on the lens, and adjust the focus manually.
You cannot focus a photo looking at the results in the LCD until the exposure is good, so the first step is to start with some settings and take a few pictures and look on the LCD and see how it looks. Start with an F-stop (aperture setting) of F16 and a shutter speed of 1/125 of a second. (Shutter speed will display as 125)
Take a photo using a remote shutter if you have one, if not set a one or two second timer and get your hand away from the camera after carefully pressing the shutter button.
Is the moon too dark? (It shouldn’t be unless you started after totality). If it is too dark, then change the shutter speed to a number about half of what it was before, which in most cameras is going to be 1/60th of a second (60 on the dial). Every time you take a photo, if the photo is too dark, you will make the shutter speed number smaller, until you see 1”, and then when you see the “ after a number, it indicates the number of seconds, but you would keep turning the dial in the same direction, even though at this point the numbers will get larger. Shots for 2 seconds or more are going to be blurry though.
Is the moon too bright, where the edges are blurry and you can’t see any features of the moon? If the moon is too bright, you are going to increase the shutter speed, so make the shutter speed number bigger. If you started out at 125, try 250. (1/250th of a second). Each time a photo of the moon is too bright, increase the shutter speed number. Try to remember which direction you turn that makes the photo brighter or darker.
Once you have an exposed photo where you can see the features of the moon, then start taking photos and look at each photo and adjust the focus, until it is sharp. You can zoom in on the picture on your LCD and try to find a crater and see if the edges of the crater are sharp. You will want to see the edge around the moon be really sharp as well. Once the eclipse is under way, it’s hard to focus, so get your focus right before the eclipse is started. After this point don’t turn the focusing ring on your lens. Make very small adjustments between photos when fine tuning the focus. Once focus is achieved keep your hands off the lens.
Taking Photos During the Eclipse Totality
During the eclipse, the moon is going to get darker and darker. You can play with the shutter speed during the partial phases of the eclipse, but at some point, you are going to want to start exposing for the totality phase when the moon is totally blocked by the earth’s shadow. This is when you are going to get the blood/red moon. The 2019 eclipse will last nearly an hour in the totality phase so you have time to get a nice photo. It will be extremely hard to focus once the moon is totally dark, so hopefully you got a good focus before the eclipse got too far in and didn’t accidentally change it. Play around during the partial phases, but it will be a bit difficult, because the part of the moon not covered, will be extremely bright while the dark part will be very dark. Still it’s fun to take photos, so take them. As the eclipse gets closer to totality start getting your exposure set for the dark part of the moon.
For totality, you are trying to take a picture that looks somewhat similar to the third picture from the left (second from the right). Taking the photo during totality is going to be slightly different, because you can’t keep increasing the time the shutter is open, because once you get up to 1, 2 or 3 seconds, the rotation of the earth will cause the moon to blur. Hard to believe, but definitely with a 1 second shot, the moon will begin to blur. The maximum you might be able to stretch the time is to three seconds, but don’t count on a 3 second photo that looks great on the LCD as being the one you will end up keeping and sending off to your friends.
The more “zoomed in” you are, the more you will notice the blur. You have about an hour to get a decent eclipse photo, and all you really want is one good shot, so there is some time to experiment.
It’s probably best to just set your lens to ISO 800 at this point.
Take a photo and look at it in the LCD. You will do this between each adjustment, so that you can figure out if you are turning the dial in the correct direction.
If the photo is too dark, change the aperture number. If you started out at F16, you might want to change it to F8. If the photo is too dark, make the aperture number smaller each time, until you reach the lowest number that your camera will display. A lot of lenses have 5.6 as the smallest number and once you hit the lowest number, you will have to go back to adjusting the shutter speed.
If at any time the photo is too bright, you can change the shutter speed to a higher number. This really isn’t going to be the main problem during totality, the problem is going to be that the photos are too dark unless you are taking really long shots, in which case they are going to be blurry. Your goal is to find the best combination of setting before the eclipse is over. Luckily for you, this isn’t the two minute totality of the recent solar eclipse.
If a photo is too dark, and you’ve run out of low aperture numbers, for most lenses this will probably be around F5.6 or F4, you will have to start changing the shutter speed number. The numbers should get smaller and smaller i.e. 250, 125, 60, 30, 15, 5, 1, etc. 1” is a full second, then the numbers will get larger. Each time the shutter number gets smaller, it is taking a longer photo, though once you hit 1”, then the numbers will be increasing because it is now measuring seconds instead of fractions of seconds. If the moon is starting to blur because you are taking 1” or 2” second photos and you’ve run out of low aperture numbers, the last real alternative is to increase your ISO. If you started out at ISO 400, then you will want to increase it to ISO 800. On older cameras, you don’t want to have to go beyond ISO 800, but you can try ISO 1600 if necessary and newer cameras do better at higher ISOs. As the ISO number increases, the photo will become grainier, but if that is the only way you can get the photo to be bright enough without blurring due to rotation, that is what you do.
Once you have a photo you think is okay and have taken a few shots, start adjusting the shutter speed one click in a given direction, at a time, and take a photo. First move the shutter speed dial in one direction for a few clicks taking a photo or two after each adjustment and then move it in the other direction repeating the process. Just because photo looks like you nailed it in the tiny LCD doesn’t mean it is the best exposure you could have gotten. Do this to increase the brightness, and then move the shutter the other way, and take some more photos as the photos get darker, adjusting the shutter speed one click at a time.
After you’ve adjusted the shutter speed, then move the aperture up a notch to F8, and take some photos, and then adjust the shutter speed again, up and down taking photos along the way.
You can also reduce the ISO number to a lower number, and take a photo, and adjust the shutter or aperture and take some more photos.
Only adjust one thing at a time between photos so that you can see the effect on the photo, if you adjust two things at once, you can’t get a feel for what is happening and if you change two things in opposite ways, you won’t even see a change.
Each time you take a photo, look at your LCD and decide if a photo is too bright or too dark, and adjust the shutter, aperture or ISO. Adjust one thing at a time, between photos so that you can see the results. You don’t have to remember which way to move the numbers, as long as you only change one thing at a time between photos, so that you can figure out if you are making the photo darker or brighter. Unless you know what you are doing in manual mode (in which case not sure why you are reading this), making two adjustments at once will get confusing.
HINTS
1. If you shoot in RAW mode instead of JPG, you will have a bit of range on adjusting the exposure afterwards. Shooting in JPG means you have to really have to get the exposure spot on to get a good photo, but if you shoot in RAW mode, you might be able to stretch the exposure, because the trick during totality is getting a long enough photo without the moon blurring due to the rotation of the earth. If you are using a tripod, and a lens that didn’t cost two or three month’s salary, you are probably going to need all the help you can get. If you are uncomfortable with raw, use the highest JPG setting; better yet, if your camera has it, use a RAW + highest JPG setting for each photo. Then if you have something that is “almost there” in JPG you can play around with the RAW photo.
2. Use a remote shutter trigger if you have it, use a timer delay of a second or two if you don’t
3. Use mirror lock up if you know how to use it. Just remember that it probably takes two presses of the button to take a photo, one to lock up the mirror and another press to take the photo. Mirror lockup reduces the vibration for a sharper photo, unless of course you are jerkily pressing the shutter manually, in which case mirror lockup isn’t going to help.
4. If you don’t have a remote shutter trigger, and aren’t using a delay, when you press the button, press the shutter button down steady and fully and hold until the shutter releases. Don’t jab at the shutter, do it is steady as you can. Take a breath and hold it while the picture is being taken. You want manual shutter presses to be as steady as possible. If you know how to set your camera where it will fire off multiple shots as long as you hold the shutter down, hold it down and get a few photos at a time; hopefully one of them will be sharp.
5. The higher the ISO number, the brighter the photo will be, but it will also be grainier.
6. The lower the Aperture number, the brighter the photo will be.
7. The longer the shutter speed, the brighter the photo will be.
5. Practice taking moon shots ahead of time. During the eclipse is not the time to learn how to use your camera settings.