Photographing the Solar Eclipse 2017
Solar Eclipse 2017
PREPARATIONS and PRACTICE
There were a lot of practice sessions involved to get my photos of the solar eclipse. My primary goal was to get good photos and also to automate the sequence so that I could watch and enjoy the eclipse, and not have to worry (too much) about my camera equipment. My secondary goal was to have a backup setup, so that no matter what I got a photo or two worth keeping. Since this was my first eclipse, I really didn’t know what to expect, but two minutes of totality doesn’t leave a lot of room for error, so preparation was the key.
Before the first practice session, I thought I’d need a two hour setup time frame. By the time I did the third practice session I’d upped the setup time to about three hours, and wasn’t 100% confident that would be enough time.
I prepared a massive list of every cable, battery, connector, filter etc. that I checked off as the truck was loaded to make sure I didn’t forget anything. This list was prepared during my practice sessions. Once the truck and camper were packed, I went back over the list to double check that everything was indeed in that truck/camper.
ECLIPSE TRIP
We drove to Pendleton Oregon and spent Saturday night and drove to John Day the next morning. Traffic was surprisingly light for the trip to John Day.
The night before the eclipse, I did a polar alignment on my Equatorial mount for the telescope setup. It was cloudy, so I had to stay up a bit late to wait for the clouds to lift so that I could see Polaris and do the alignment. During my practice sessions, the sun would drift quite a bit, because I didn’t get a good polar alignment for my telescope mount. It wasn’t a massive drift, but every fifteen or twenty minutes I had to realign the sun during the tests, so I did want a half way decent polar alignment. At this point I wanted to eliminate as many potential problems as possible.
After the main setup was aligned, I left the alignment for the backup mount that had my camera/lens setup for the next day and did a rough alignment on that mount the next morning.
ECLIPSE DAY
The morning of the eclipse, after a whopping two hours of sleep, I was up at 5:00 am, and setting up the gear by about 6:15 am. By 8:00 am, I was honing in the focus and setting up the laptops to run the cameras.
TELESCOPE SETUP
My main setup was an explore scientific 80mm ED Triplet refractor on a Sirius Equatorial Mount using a Canon 5dmiii camera. I purchased a DSUB connector for this setup so that I could get faster shooting during totality since doing all the work through a USB cable is quite a bit slower, and the load was split between the DSUB cable and USB cable. A Thousand Oaks glass solar filter was used during the partial phases. Eclipse Orchestrator was the program used to run the photo sequencing during totality. I was able to get about 115 shots off during totality with this setup. The shots for totality varied in speed from about 1/4000 of a second to 2.5 seconds. The laptop running this setup was running Windows 7.
CANON CAMERA AND LENS SETUP
My backup setup was a Canon 60da (astronomy version) camera with a 100-400 lens on an inexpensive “astro-photography” equatorial mount that is powered by 4 D Cell batteries. The connection was to an older laptop running Vista via a USB cable. This was the slower setup, but was my backup position. With this setup I got about 85 photos off during the two minutes of totality. I “aligned” this mount using my Sirius mount as a guide and got it fairly close, but still had to adjust the position of the sun about 4 times during the eclipse.

Setup and ready to go.
PRACTICE PAID OFF
All the practice sessions at home really paid off. By hauling all my gear out to the front yard several times, I was able to figure out the problem areas ahead of time and get them resolved. I started practicing in June. I ended up having to purchase new batteries for the laptops, a new Celestron battery pack to run the mount (using the old battery pack to keep the laptops charged up during the three hours) and a cable for my husband’s laptop to connect to the battery pack.
I also had to learn how to find the sun through the telescope which isn’t as easy as it sounds. The first time I did it, it took me about 1/2 hour to 45 minutes. I purchased a little solar filter for the finder scope. There were other things that the practice sessions helped with, such as figuring out how to focus in the bright daylight (a dark bath towel covering my head and the laptop was the low tech and free solution.)
Double sun reflections were a problem, and eliminated by adding a small strip of felt to one side of the solar filter so that the filter was slightly angled. I encountered a surprising number of issues during the practice sessions. Since I had done a few lunar eclipses and do astrophotography, I had erroneously thought my photography experience would make it pretty easy, but each session proved I needed more practice. I did three full practice sessions with the telescope and camera setup, and another three setup sessions with the alternate camera and lens setup.
In the evenings I practiced the Eclipse Orchestrator scripts for each of my camera setups dozens of times. The practice sessions identified a problem where the program wouldn’t fire the shutter, and I figured out that I always had to fire a test shot to make sure the program and camera were talking properly, or else the camera might not take the photos when scheduled. This isn’t an issue I’ve had with my other astro-software which is Backyard EOS. Nonetheless, once the software was communicating properly, it worked reliably. If it wasn’t communicating, then there was a sequence, of shut the software down, turn off the camera, disconnect the cables from the computer and the camera, reconnect the cables, turn the camera on, and then restart Eclipse Orchestrator, and try the test shot to be sure all was communicating.
Other parts of testing included making sure that the photography sequence was able to fire all the shots, and not skip or hang up with trying to take too many photos. The program was not forgiving and would let you schedule more photos than you could take. Since everything depended on split second timing, I had to make sure it would take the photos at the right time and not overflow my camera buffer and skip photos.
Testing on the Canon 5dmiii showed that if I removed the SD card and left in my CF card only, the camera can save the photos much faster. Apparently the CF card slot is where Canon put the emphasis on speed. This knowledge will actually will come in handy for bird photography. It was a bit nerve wracking to only save my photos to one CF card, with no backup on the computer and no backup card in the camera, but I did have a second camera setup for my backup position. However it was the only way to be able to get 115 photos in the two minutes of totality. The backup setup was only able to get about 85 shots during totality, but that was on the slower camera and using a USB cable.
I used backyard EOS to take the photos of the partial phases of the eclipse. I bracketed the shots, but now wish I would have just taken one shot a minute instead of three shots every three minutes during the first phase, because it would have made for a smoother video. For the phase after totality, I took one shot a minute and that worked out smoothly for the time lapse video. I wasn’t thinking about doing a time lapse video with the stills, so that happened after the fact.
Both Camera batteries held for the three hours of the Eclipse.
ISSUES DURING THE ECLIPSE
During the eclipse, I ran into a couple issues. The first problem was that I hadn’t tested my older battery packs ability to charge two computers at the same time, and it wasn’t up to the task, and quit charging the computer batteries about 1/2 hour into the eclipse, making me worry that the computers might not make it through the entire eclipse, or worse, fail during the totality phase. I had a surge protector and a long extension cord, and we ran the camper generator for about fifteen minutes to give the computer batteries a boost and both laptops had power through the entire eclipse. The generator was messing up another campers video (or more likely audio) so we shut down the generator at 10:00 am.
I noticed the second issue about 25 minutes before totality. For some reason my Windows 7 laptop (running the primary telescope setup), hung up while running Backyard EOS. It was still taking photos, but I couldn’t control the mouse, and I couldn’t shut the program down and my plan was to shutdown Backyard EOS and use Eclipse Orchestrator for totality. Totality was due to start at 10:22, so at 10AM I made the do-or-die decision to hard crash the computer and reboot it. (Yes, a tidy shutdown would have been better, but I couldn’t control the computer, and couldn’t get it to respond via the mouse or using any of the command keys.)
After the computer came back up, it was still flaky so I rebooted once again. After the final reboot, I hooked up the camera and started Eclipse Orchestrator and fired my test shot. Only the program wouldn’t fire the camera shutter. I followed my much practiced shutdown and restart sequence and it still wouldn’t fire the test shot. Panic was starting to set in, because totality was less than ten minutes out. I started eying the remote shutter control, but really didn’t want to have to change the settings manually and fire the shutter myself during totality. I also didn’t really want to depend on my “backup setup” because the best shots were going to come off the telescope and canon 5d miii setup.
I did my whole shutdown, disconnect cables, camera off, cables connected, camera on, Eclipse Orchestrator sequence three times, before the program finally fired the camera shutter. I had maybe six minutes until totality at this point. Once I had a test shot fired on both systems, I fired a test shot every minute or so until totality just to make sure the communication line was kept open.
Everyone swears Windows 7 is the robust operating system, but the older laptop running the despised Vista operating system, didn’t miss a beat.
Since I only had a few minutes left, I didn’t reposition the sun in my frame, because I didn’t have time and didn’t want to accidentally mess anything up. Also, by now, the sun was just a sliver, through the filter, and it was getting harder to see it. This is where staying up late the night before and doing a good polar alignment really paid off, because the Sun hadn’t drifted too far off center in the couple of hours since I had set it up and started tracking.
About three minutes before totality, I started hunting for my eye-glasses. I am nearsighted, so had been doing the final totality setup without my glasses, but I can’t see twenty feet in front of me without my glasses. I couldn’t find my glasses for a minute or so. Finally spotted them nestled next to the furthest laptop. Three or four minutes to go.
I took the filters off about two minutes before totality, and put a towel over the lens and telescope. Eclipse Orchestrator has a nice feature where it says “Filters Off”, “Filters Off”, so all I had to do was pull the towels off, and then enjoy the eclipse while listening to two camera shutters firing like a machine gun.
The eclipse was a beautiful sight. I’m glad I was able to automate the photography part and just watch the eclipse. I couldn’t have fired off that many photos and done the necessary shutter changes and still have enjoyed the totality phase itself. It’s hard to describe how totality looks. The corona just shimmers with light, and it’s quite spectacular. You can see stars and planets and it gets pretty dark.
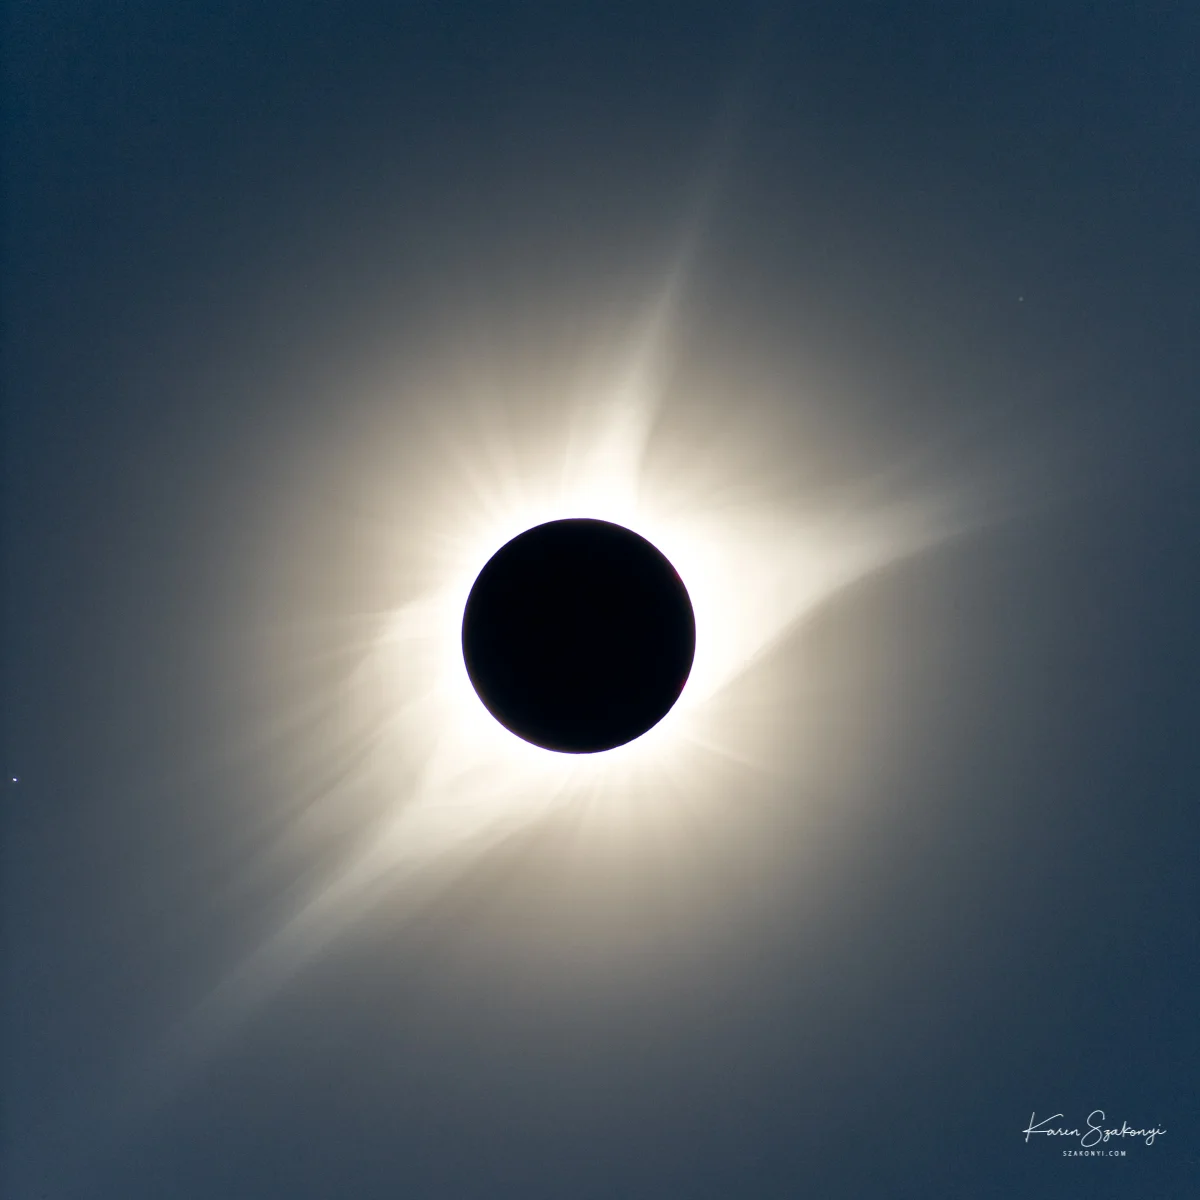
Corona during Totality.
Once totality was over, the filters were back on, and Backyard EOS was restarted on both laptops, and each camera took a photo a minute until the end of the eclipse. I just left both systems on auto, and enjoyed the rest of the eclipse and was able to walk around and see what other people were up to in our camping area.
I knew I was taking a bit of a risk on Eclipse Orchestrator, but once connected, it ran perfectly, and they have an excellent sequence programmed up for the totality phase once you tune it in. The communication seems a bit dicey and it behaved that way with both cameras during test, but it pulled it out.
For my telescope setup, the exposure for the partial phase was ISO 200, shutter speed 1/2000. The telescope is F6. For the camera with the 100-400 lens, I used the 400 focal length, F8 and I slightly underexposed at 1/2000 and it would have been better at 1/1000, but it looked like it was okay on the computer monitor, and I didn’t bracket that camera setup. However, it is all in RAW, so adding a stop or two of light in post processing makes it work out fine, and the photos were better from the telescope setup, so I haven’t worried too much about missing the exposure a bit on the camera with lens setup.
This was my first solar eclipse. The skies were clear, and the practice sessions really paid off. I was really thrilled with the quality of the totality photos, just out of the camera.
Traffic home was a bit hectic and it took 11 hours to get home, where as it had only taken about 6 hours to get to John Day from our house. All in all, well worth it.

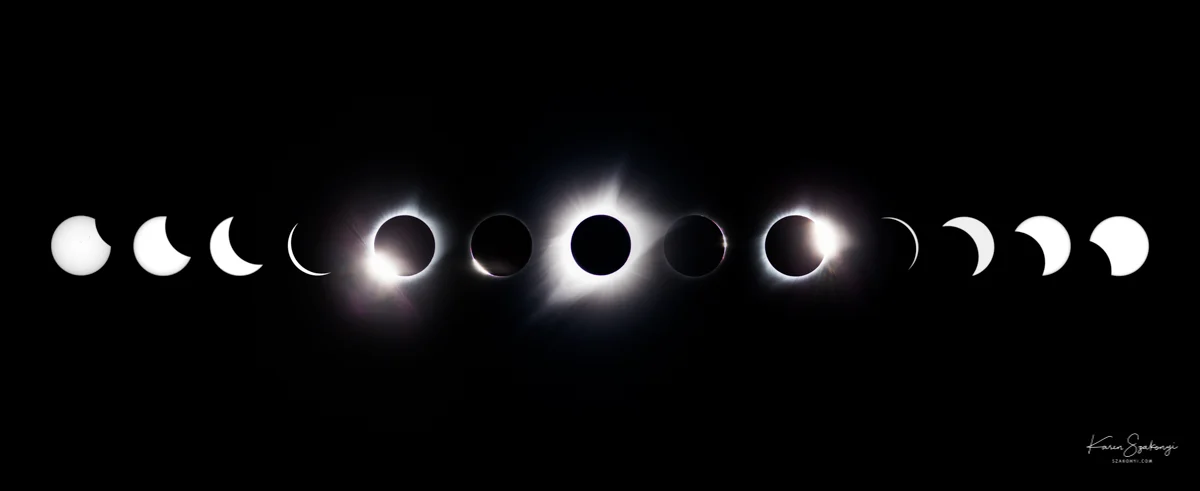
Poster of the phases of the solar eclipse. Follow the photos from the left corner, clockwise to see the order of the phases of the eclipse.